Ray Tracing
Where is the Image? The image produced by a converging lens will only be at the focal point if the object is infinitely far away. This makes the rays from each point of the object parallel with each other, just like in the "Refraction" and "Reflection" notes pages. If the object comes close to the lens, the rays entering the lens are diverging when they hit the lens, the lens will have a 'harder' time converging them, and the image will be further away from the lens than the focal length. In fact, if you bring an object too close to a lens, the rays hitting it will be diverging at such a great angle that the lens, even though it's a 'converging' lens, will fail to converge the light to a real image. Let's see how you can find out exactly where the image will be for all object distances. There are two ways: using a scale drawing (called ray tracing) and calculating (using the so-called thin-lens equation).
to do as you read
Ray Tracing Here's the procedure, step-by-step:
• Draw your lens as a vertical line. Although lenses do have some thickness and curvature to them, don't worry about that — just draw a line. (The thickness is usually small compared to the distances involved and can be ignored.)
• Draw the principal axis — a long line perpendicular to the lens through its midpoint.
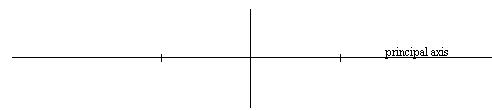
• On the principal axis, draw two tick-marks a distance f from the lens on both sides. At this point your drawing should look something like this:
• Draw the object (usually depicted as an arrow) to the left of the lens, at the distance specified in the problem.
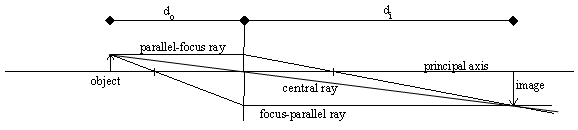
• Light rays are being diffusely reflected by all points on the object, in all directions, but we only need to look at what happens to three rays (the so-called principal rays) coming from the top of the object. First the one ray that happens to be going parallel to the principal axis will, after hitting the lens, go through the right-hand focal point. We call this first ray the parallel-focus ray. The second is the focus-parallel ray: it's the ray that starts out in the direction of the left-hand focal point. After going through the left focal point it hits the lens and will end up going parallel to the principal axis. The third is the central ray: any ray that goes through the center of a lens comes out with its direction unchanged.
• Where the three rays intersect is the tip of the image.
NOTE: In order for all this to work, the drawing must be drawn carefully, to scale. If the scale is other than 1:1 (i.e. full size) then be sure to right down what scale you are using.
EXAMPLE: here is a completed diagram for a lens with f = 22 mm and an
object that is 33 mm away. Notice that the image is upside-down and larger
than the object. (NOTE: this diagram was originally drawn at 1:1 scale.
Your browser probably won't display it at the same scale.)
1. Go to http://phet.colorado.edu/simulations/lens/lens.swf and play with the lens simulation. Turn on the principal rays. Move the object closer and further from the lens and verify for yourself that:
- An object further than 2f from the lens will produce a real, upside-down image smaller than the object.
- An object between f and 2f from the lens will produce a real, upside-down image larger than the object.
- An object closer to the lens that f will produce a virtual, right-side-up image.
Here's a different version that doesn't look as fancy, but handles diverging lenses as well as converging, and also converging and diverging mirrors.
2. You have a lens with f=35mm, and an object 60mm away from it. Draw a ray-tracing diagram to find the location of the image. Measure the resulting di.
Thin-lens Equation If the distance of the object from the lens is called do, the distance of the in-focus image from the lens is called di, and the focal length of the lens is f, then
A proof of this equation is given below, but for now let's do a quick example using it.
EXAMPLE: An object is 33mm away from a lens with focal length 22mm. Where is the image?
Don't forget that you have calculated 1/di, not di itself. Now, take the inverse to find the final answer.
Notice what the thin-lens equation says if the object is very far away. If do is very large, then 1/do is very close to zero, and we have di ≈ f. In other words, the image is located at the focal length from the lens only when the wavefront entering the lens are coming from a distant object and therefore close to plane waves. Recall that this was how we first defined the focal length.
Sign Conventions in the Thin-Lens Equation
- Converging lenses have positive focal length; diverging lenses have negative focal length.
- Objects to the left of the lens have positive do; negative do means the object is to the right of the lens. (We'll always start our drawings with the object to the left of the lens, but in systems with multiple lenses, sometimes an object has to be to the right of one of them.)
- Positive di means the image is to the right of the lens; negative di means the image is left of the lens.
Here's another simulation program (sld.exe; Windows PCs only) that includes the option for a diverging lens.
Magnification
The linear magnification describes the ratio of the size of the image to the size of the actual object. The ratio is the same as the ratio of the distances.
where hi and ho are the heights of the image and object, respectively. A negative sign on the magnification or image height implies that the image is inverted (upside-down).
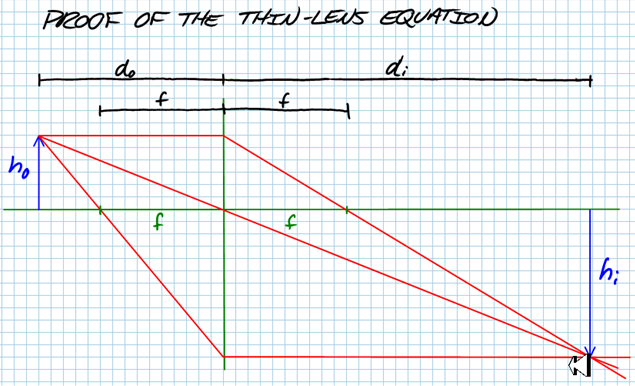
Proofs of the Thin-Lens Equation and the Magnification Equation (click image to play video)
Additional Activities & Practice
4. A locust is located 25mm from a convex lens with focal length of 15mm. Where is the image located? What kind of image is it? Is it rightside-up or upside-down? If the locust is 3.0 cm tall, how tall is the image? Solve this problem by (a) drawing a ray-tracing diagram, and (b) calculations. Solution video
5. A locust is located 25mm from a convex lens with focal length of 35mm. Where is the image located? What kind of image is it? Is it rightside-up or upside-down? If the locust is 3.0 cm tall, how tall is the image? Solve this problem by (a) drawing a ray-tracing diagram, and (b) calculations. Solution video
6. A car is located 60.00 m from a converging lens with focal length 60.00 cm. Calculate where the image is, and the magnification. Solution video
7. A stamp, 2.0 cm tall, is being held 3.0 cm from a lens that has focal length +5.5 cm. Where is the image located? What kind of image is it? Is it rightside-up or upside-down? How tall is the image? Solve this problem by (a) drawing a ray-tracing diagram, and (b) calculations. Solution video
8. A stamp, 2.0 cm tall, is being held 7.0 cm from a lens that has focal length +5.5 cm. Where is the image located? What kind of image is it? Is it rightside-up or upside-down? How tall is the image? Solve this problem by (a) drawing a ray-tracing diagram, and (b) calculations. Solution video
9. A stamp, 2.0 cm tall, is being held 7.0 cm from a lens that has focal length -5.5 cm (i.e. it's a diverging lens). Where is the image located? What kind of image is it? Is it rightside-up or upside-down? How tall is the image? Solve this problem by (a) drawing a ray-tracing diagram, and (b) calculations. Solution video
10. SPREADSHEET: Create a spreadsheet with two input cells (lens focal length and object distance) and two outputs (image distance and magnification).
11. A locust is located 25mm from a concave (diverging) lens with focal length of -35mm. Where is the image located? What kind of image is it? Is it rightside-up or upside-down? If the locust is 3.0 cm tall, how tall is the image? Solve this problem by (a) drawing a ray-tracing diagram, and (b) calculations.